

You say samosa and I say samusa
You say samosa and I say samusa
My illustrated guide to the ultimate Indian street food

Hello everyone! After a brief hiatus due to a very busy few weeks putting the wheels in motion for my Goan cookbook, I am back with issue 3 of Yesterday’s Curry Newsletter; The Samosa Edition. Having brought you all a couple of essays in March and April, this is more of a practical one, cos I know you all want recipes and I’ve been wanting to share my samosas for a while, and have some fun experimenting with pastry!
Samosa’s are the first Indian food I learned to cook, and have become my absolute favourite thing to make for people. While they are India’s most famous street food however, Samosas actually originated in the 10th century in The Middle East, and were originally called sanbosag in Persian. Emigration has taken this humble triangular snack around the globe and it is known and beloved in several different nations, each giving it its own name and pronunciation. From sambusas in the Arabic speaking world to chamuças in Goa and Portugal and samoosas in South Africa, the popular appetiser takes on many forms and can be filled with meat, vegetables or even seafood in coastal regions.
It is undoubtedly the Indian iteration, the samosa, which is the most well known, although in my Goan household and amongst many in the Goan community, they are called samusas. My grandma taught me how to make samosas and her folding technique which I learned as a child was etched in my memory until I was old enough to cook them myself. A month ago, I set out to try a few different pastries to find the perfect samosa and after some successes and failures, I am happy to report my findings. I strongly urge those who haven’t tried making samosas before to give it a go, not only is it a therapeutic process but the end product is unparalleled.
Method:
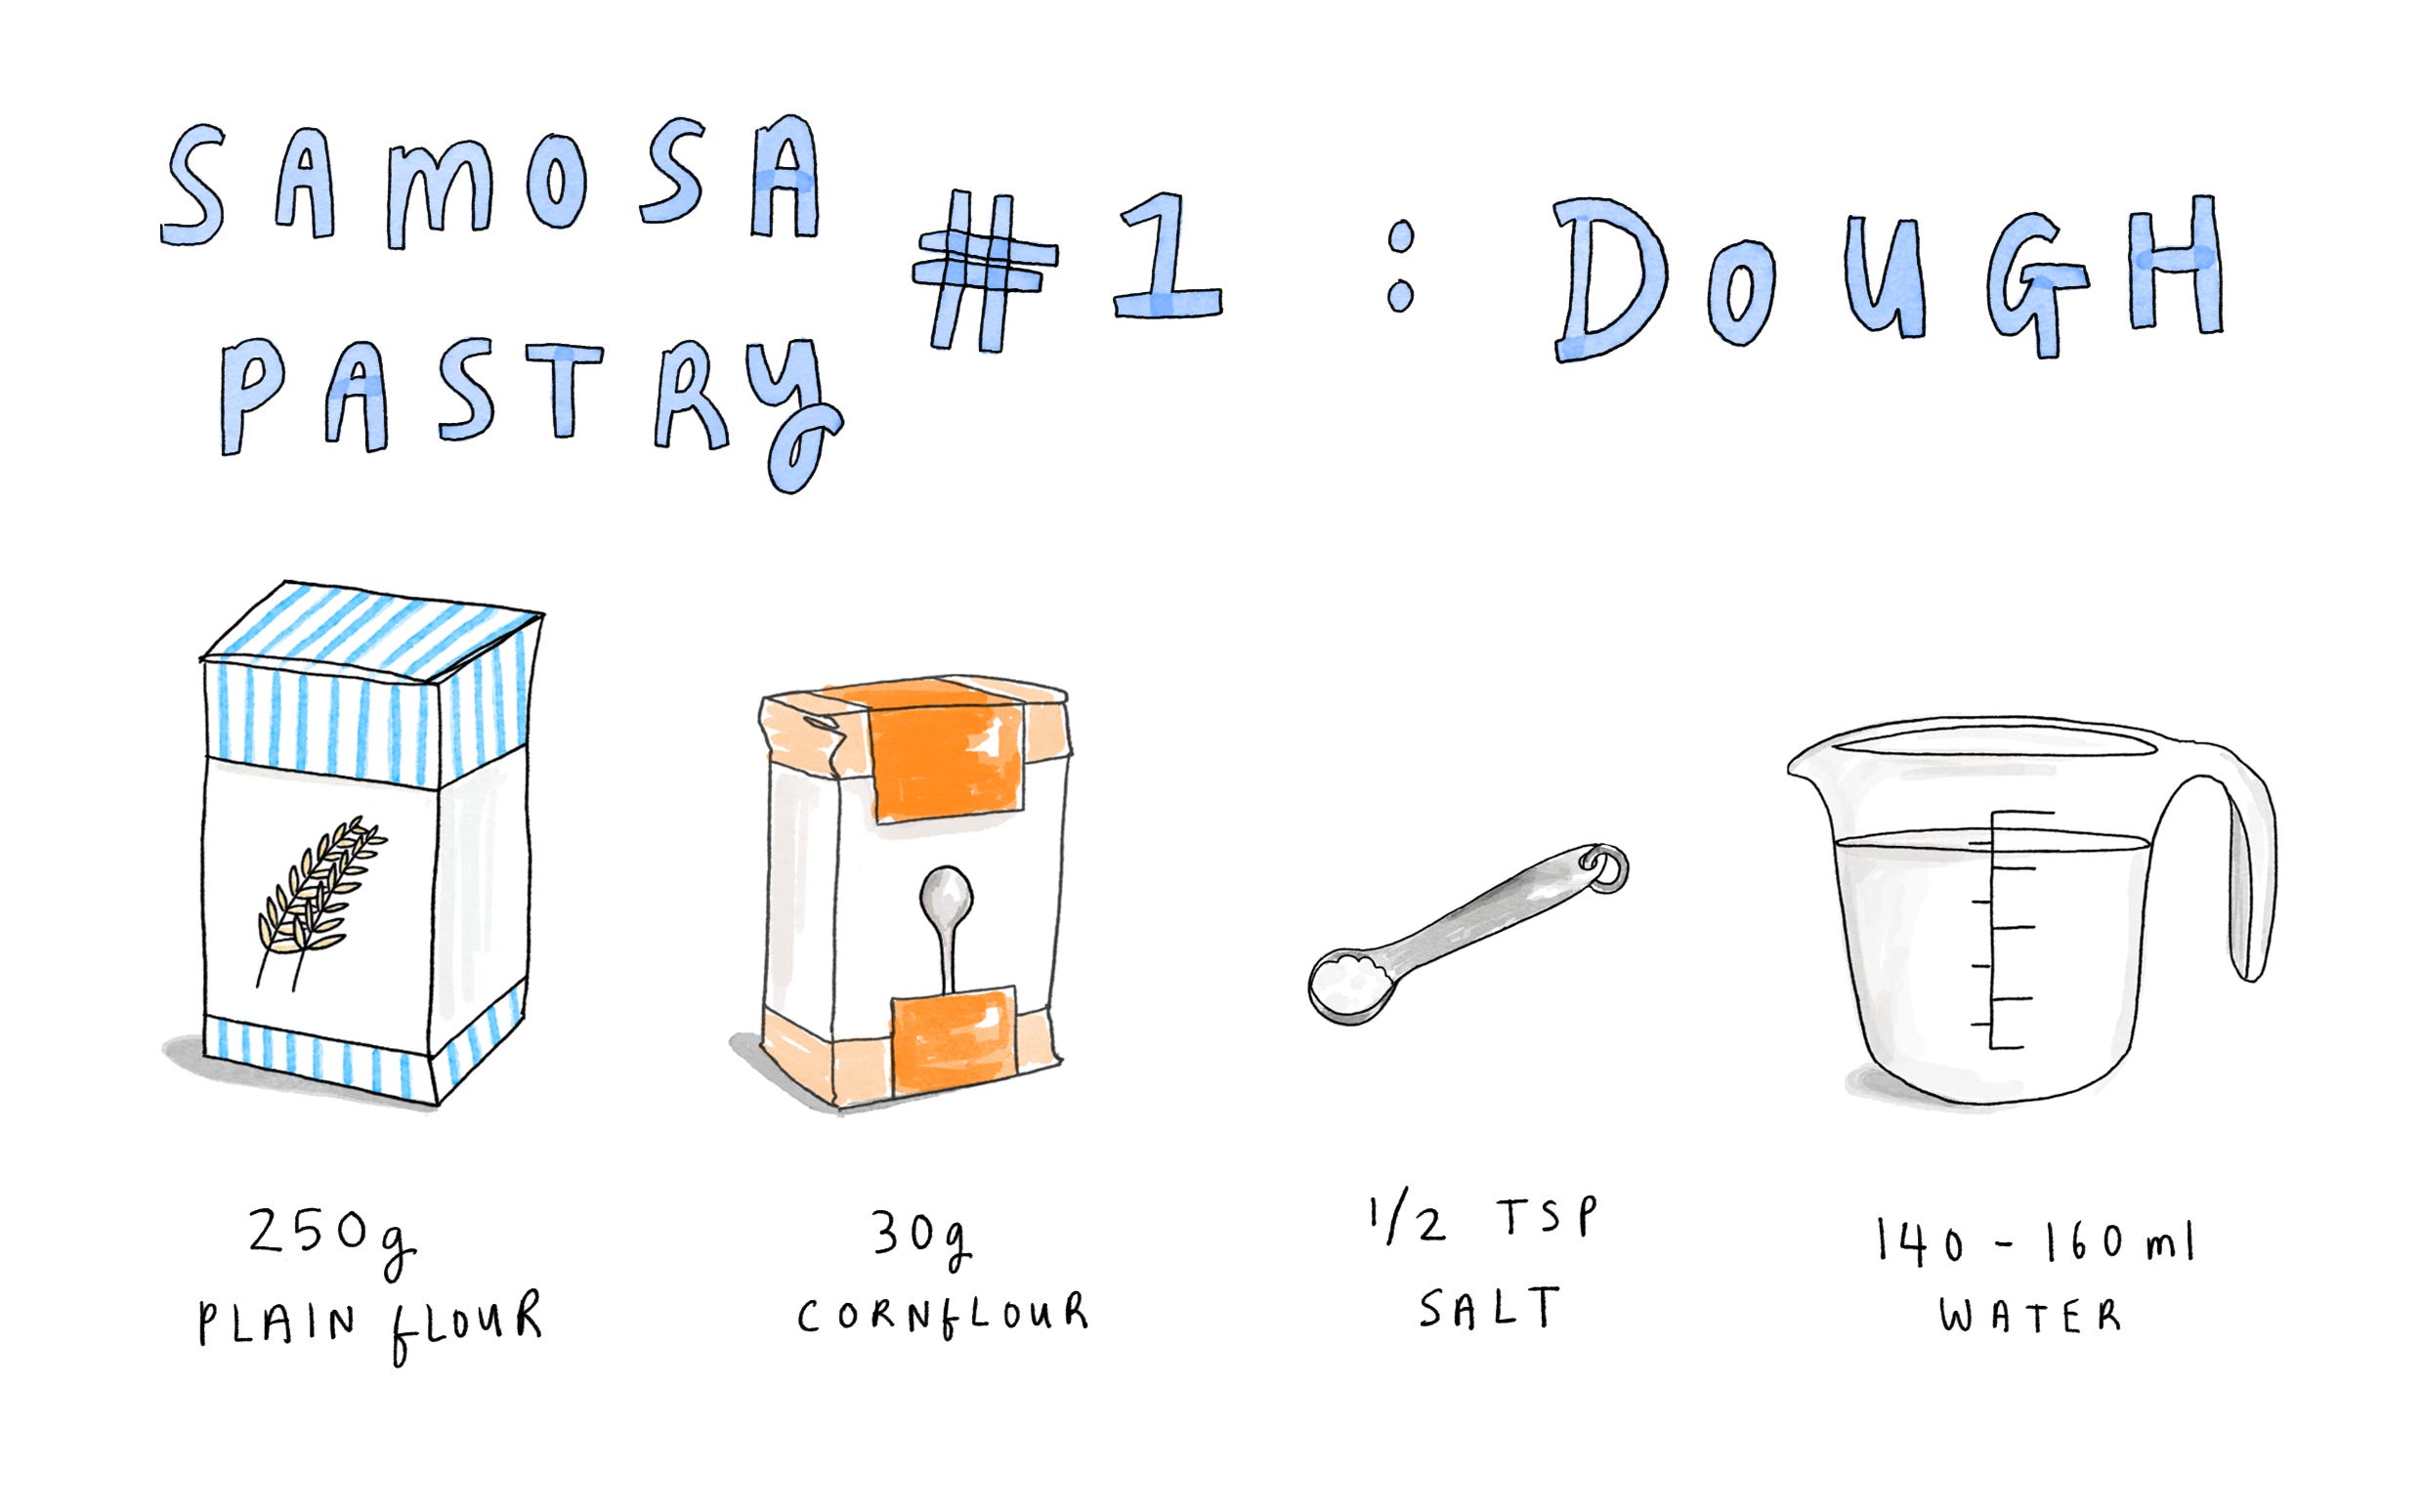
In a bowl, combine the plain flour, cornflour and salt.
Slowly add the water, stirring with a wooden spoon or cutlery knife until the mixture comes together as a dough. Start with 140ml and add more if necessary. Use your hands to bring the dough together, ensuring there are no dry patches left in the bowl.
Knead for about 5 minutes until the dough is smooth. The final dough should be smooth yet firm, not sticky. Leave the dough to rest in the bowl for about half an hour and cover with cling film.
Separate the dough into 10 equal pieces - weighing it first and dividing by 10 makes this easier. There are 2 options for preparing your samosa pastry using dough, the first in my experience being easier for beginners.
Option 1:

-In the palm of your hand, roll one of your 10 pieces of dough into a ball. (Leave the rest of the dough covered so it doesn’t dry out)
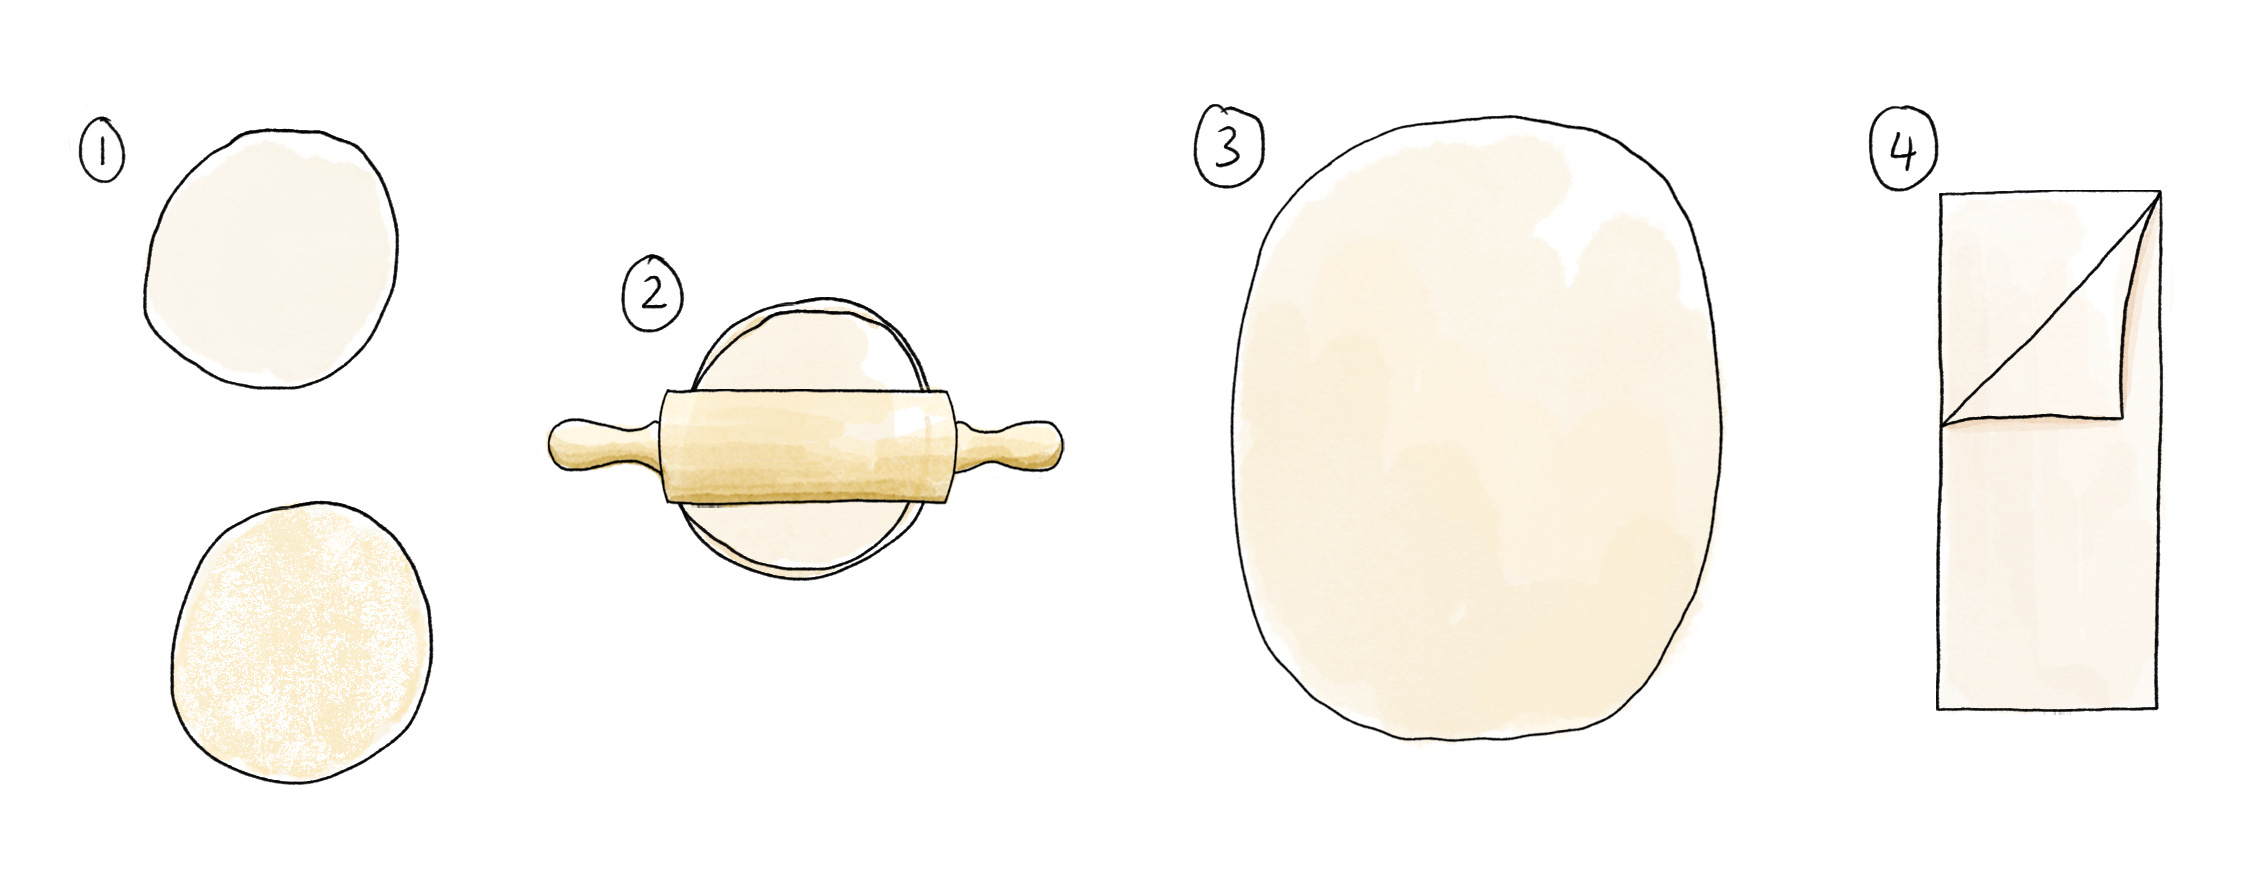
-On a floured surface use a rolling pin to roll out the dough into an oval/rounded rectangle which fits into a frying pan (fig.1). Ideally use the largest frying pan you have so that the pastry can be rolled out thinly (fig.2).
-Put the dough into the frying pan and heat up on a low heat. Cook for 2-3 minutes until the pastry becomes translucent. Flip over and cook for a further 10-20 seconds. The pastry should not be taking on any colour but should be cooked through.
-Repeat the process for the rest of the dough and layer the pastry in a stack once cooked.
-Trim the rounded edges of the pastry so that you are left with a rectangle (fig.3). Cut this in half so that you are left with 2 strips (fig.4). (The offcuts can be fried and enjoyed later)
-Repeat the above process for the rest of the dough and stack all your strips once cut. Cover the stack of pastry strips with a tea towel so they don’t dry out while you prepare the rest.
Option 2: (can take a bit of practice!)
-Roll out 2 pieces of dough into circles of roughly 5 inches in diameter (fig.1).
-On one of the circles, use a brush or your hands to spread a layer of vegetable oil, making sure it is fully covered including the edges.
-Sprinkle over some flour and then place the other circle on top, trying to get them as even as possible.
-On a floured surface, gently roll out the circles ensuring the edges match up as closely as possible (fig.2). The dough should fit your largest frying pan and be a rounded rectangle shape (fig.3).
-Put the dough into the frying pan and heat up on a low heat. Cook for 2-3 minutes until the pastry becomes slightly translucent and some small bubbles appear. Flip over and cook for a further 10-20 seconds until it puffs up.
-Transfer to a chopping board, trim off the edges, cut in half to make 2 strips and very gently peel the strips apart (fig.4).
-Repeat the above process for the rest of the dough and stack all your strips once cut and peeled. Cover the stack of pastry strips with a tea towel so they don’t dry out while you prepare the rest.

Method:
In a bowl, combine the flour, cornflour and salt.
Make a well in the middle, slowly add the water and whisk. Continue to whisk after you have added all the water to get out as many lumps as possible.
Sieve the mixture into a bowl or jug to ensure all of the lumps are removed.
Pour a very small amount of oil (<1/2 tsp) into a frying pan and use kitchen paper to rub the oil around the pan so there is only a very thin layer. Ideally use the largest frying pan you have so the pastry is as large and thin as possible.
Heat the pan on a very low heat, and then pour about half a ladle of batter into the pan. Swivel the pan around, like you would when making a crepe, so that the base of the pan is well coated in a thin layer of batter.
Cook for about a minute and a half, until the edges start to come away from the pan and the batter has completely set. Carefully remove the pastry from the pan with a spatula or if it is not too hot, peel it from the pan with your fingers.
Repeat the process with the rest of the batter, making sure to wipe the pan with a little more oil each time. Stack the circles of cooked pastry on top of each other, keeping them covered so they don’t dry out.
Once all the batter is cooked, trim the stack of pastry using the same method as the dough, so that you have a stack of pastry rectangles ready for making samosas.
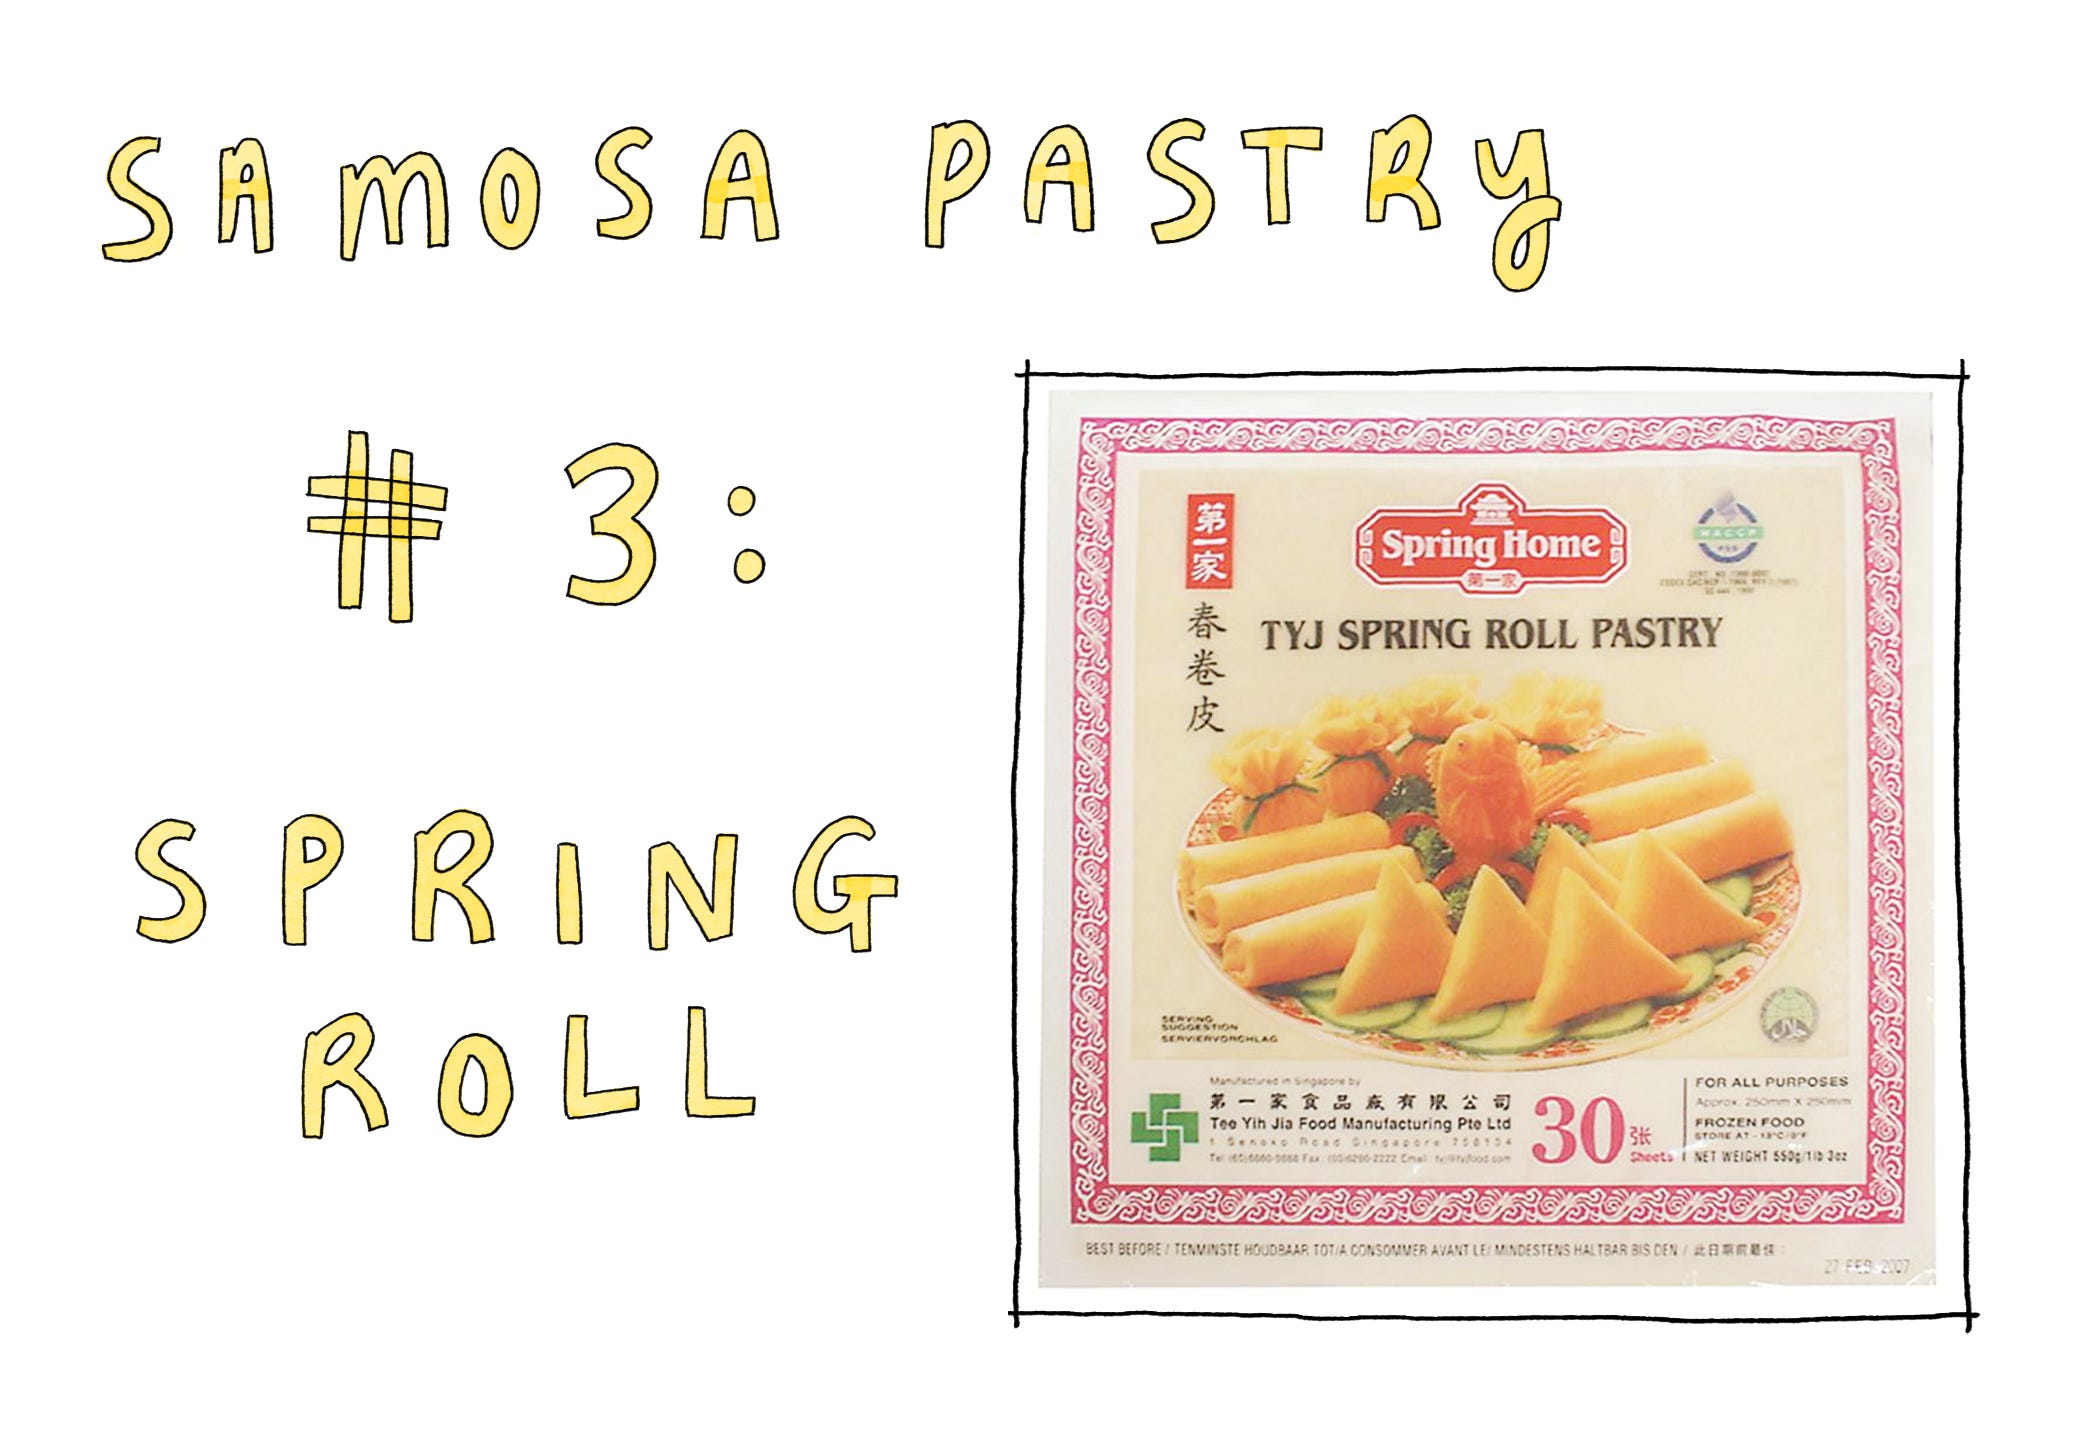
If you’re a samosa novice and you just want to have a go at making the filling, folding and frying (which to be honest is time consuming enough in itself), you can’t go wrong with shop bought spring roll pastry, and I admit, this has been my go to for many years. You can pick this up in any Asian supermarket, and the pastry is so robust and reliable that it is a great place to start to get your folding skills perfect before you branch out to homemade pastry which can be a bit more fiddly.
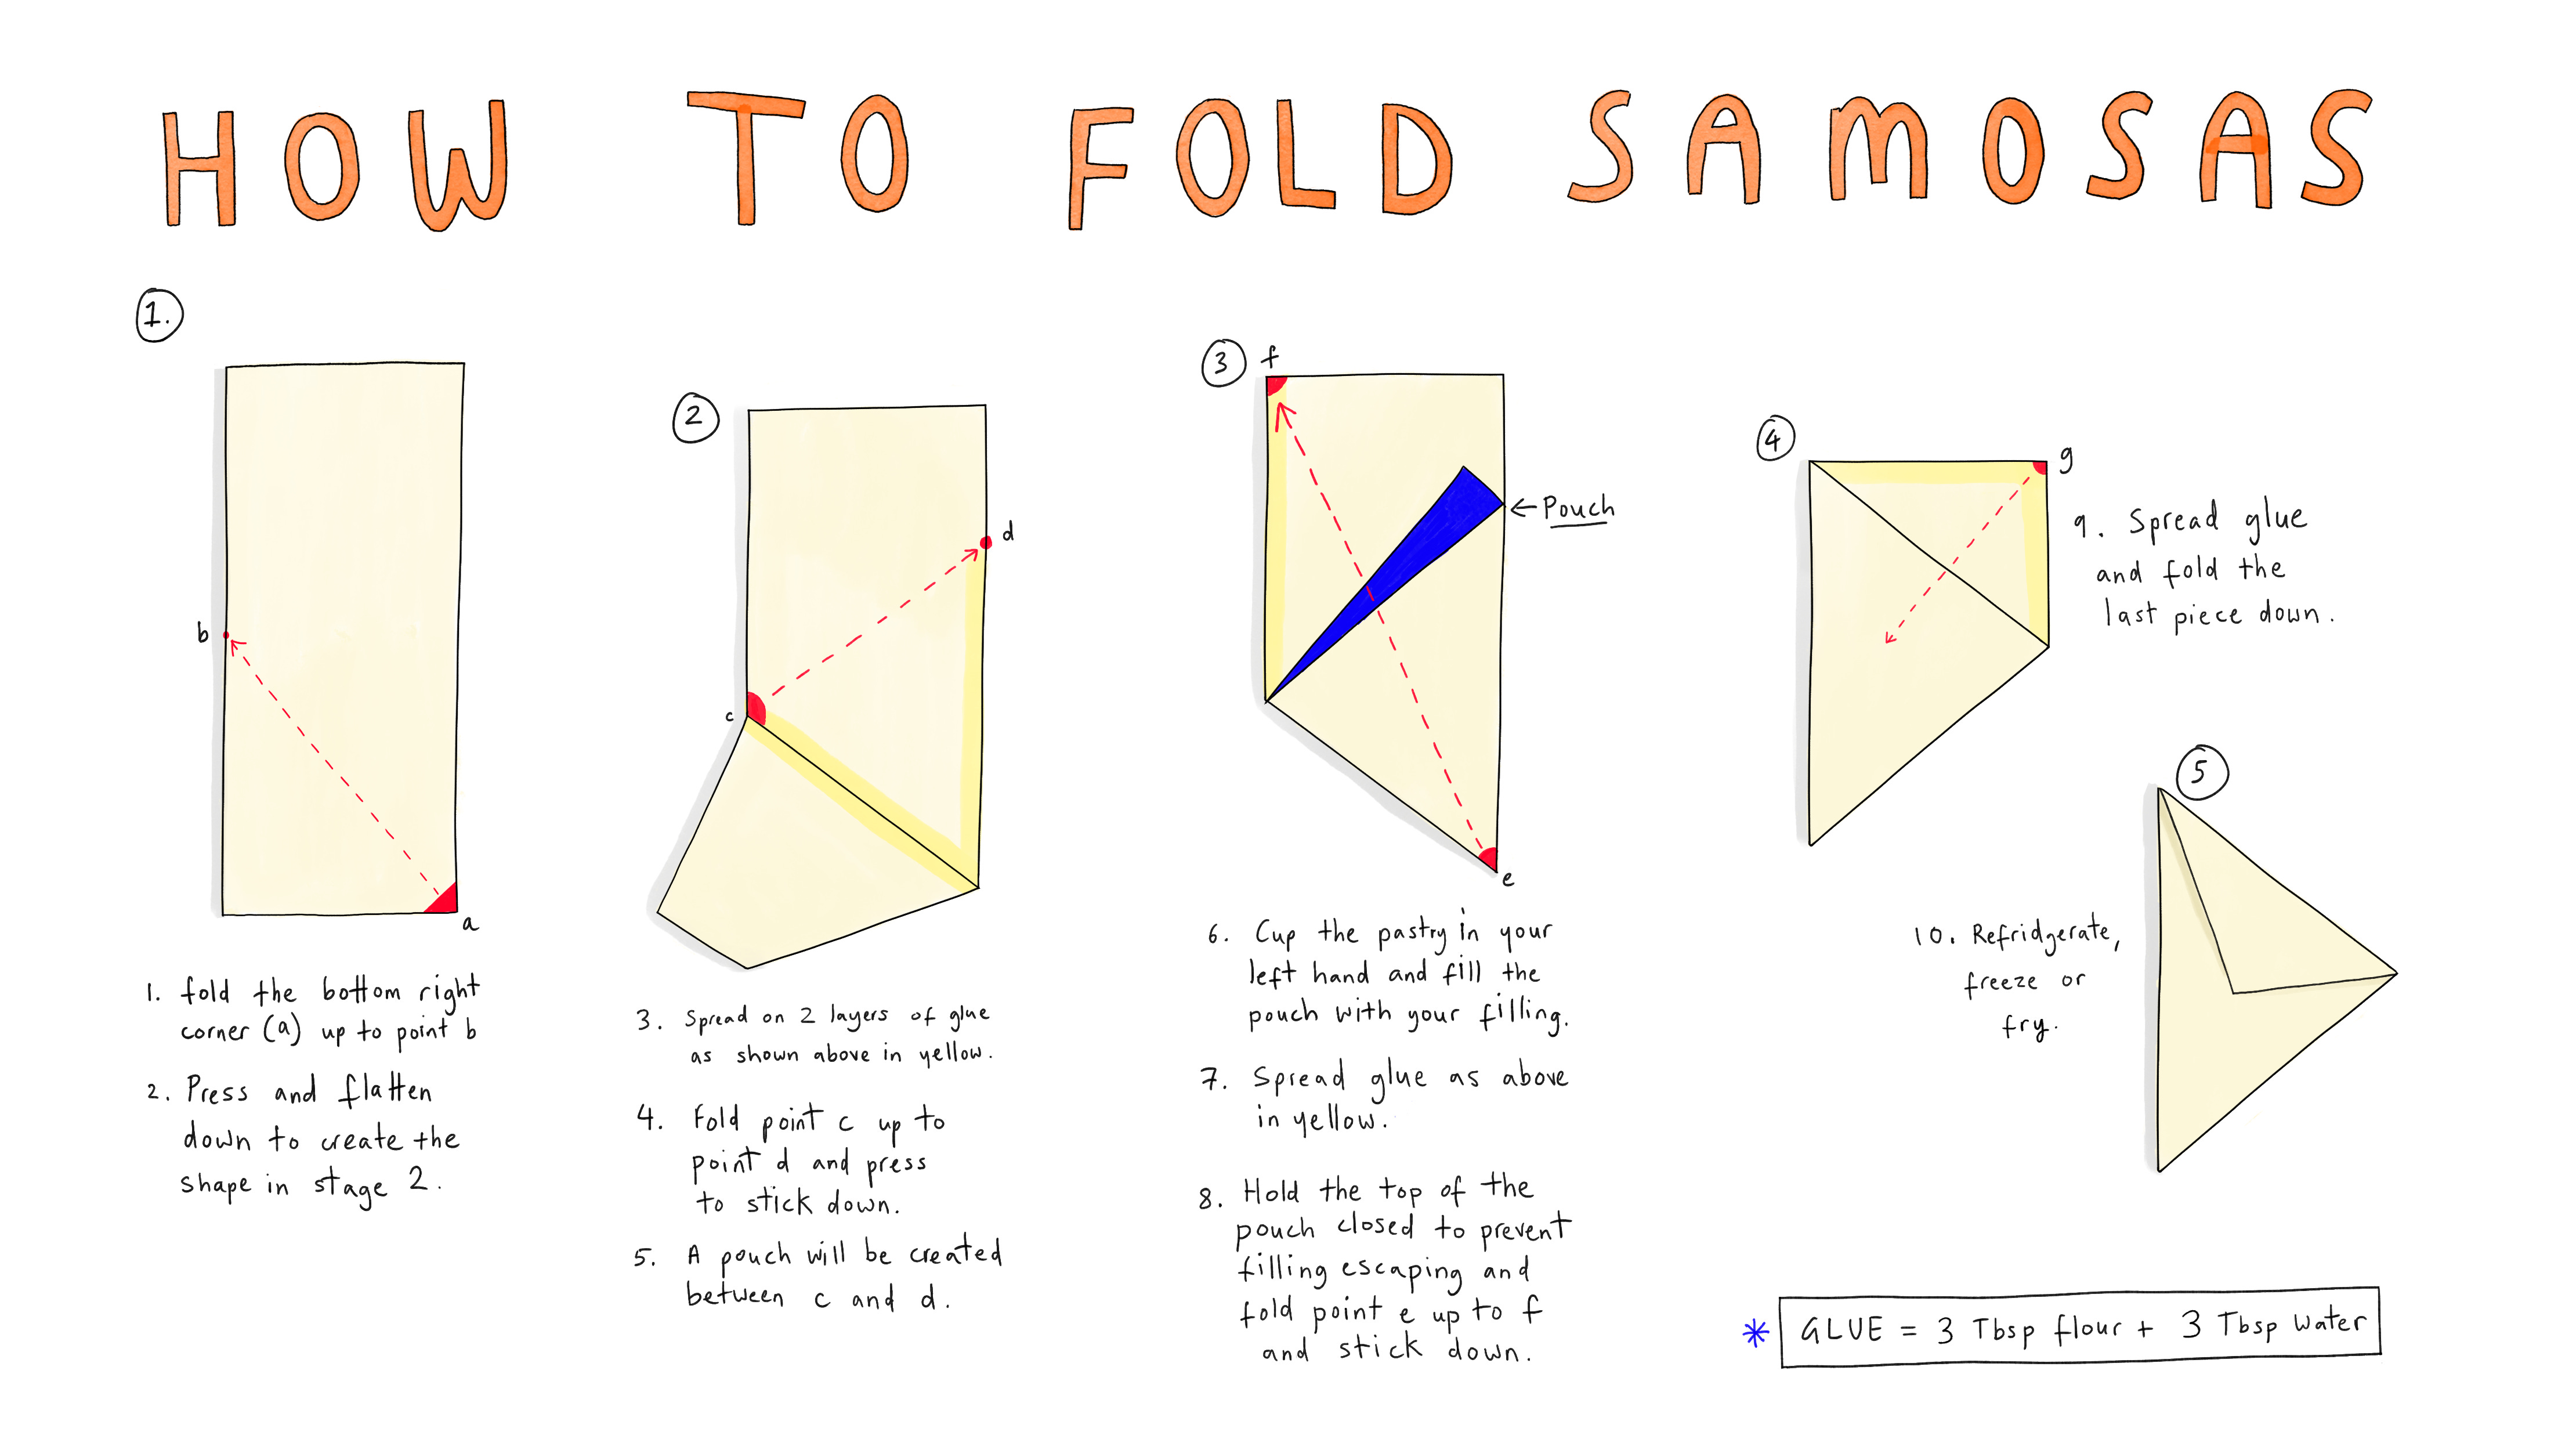
RIGHT, now onto folding…
At first glance, what looks a little scary is extremely easy to master and becomes a very therapeutic process. If you follow my diagram to a T, you will prevail in your samosa making:
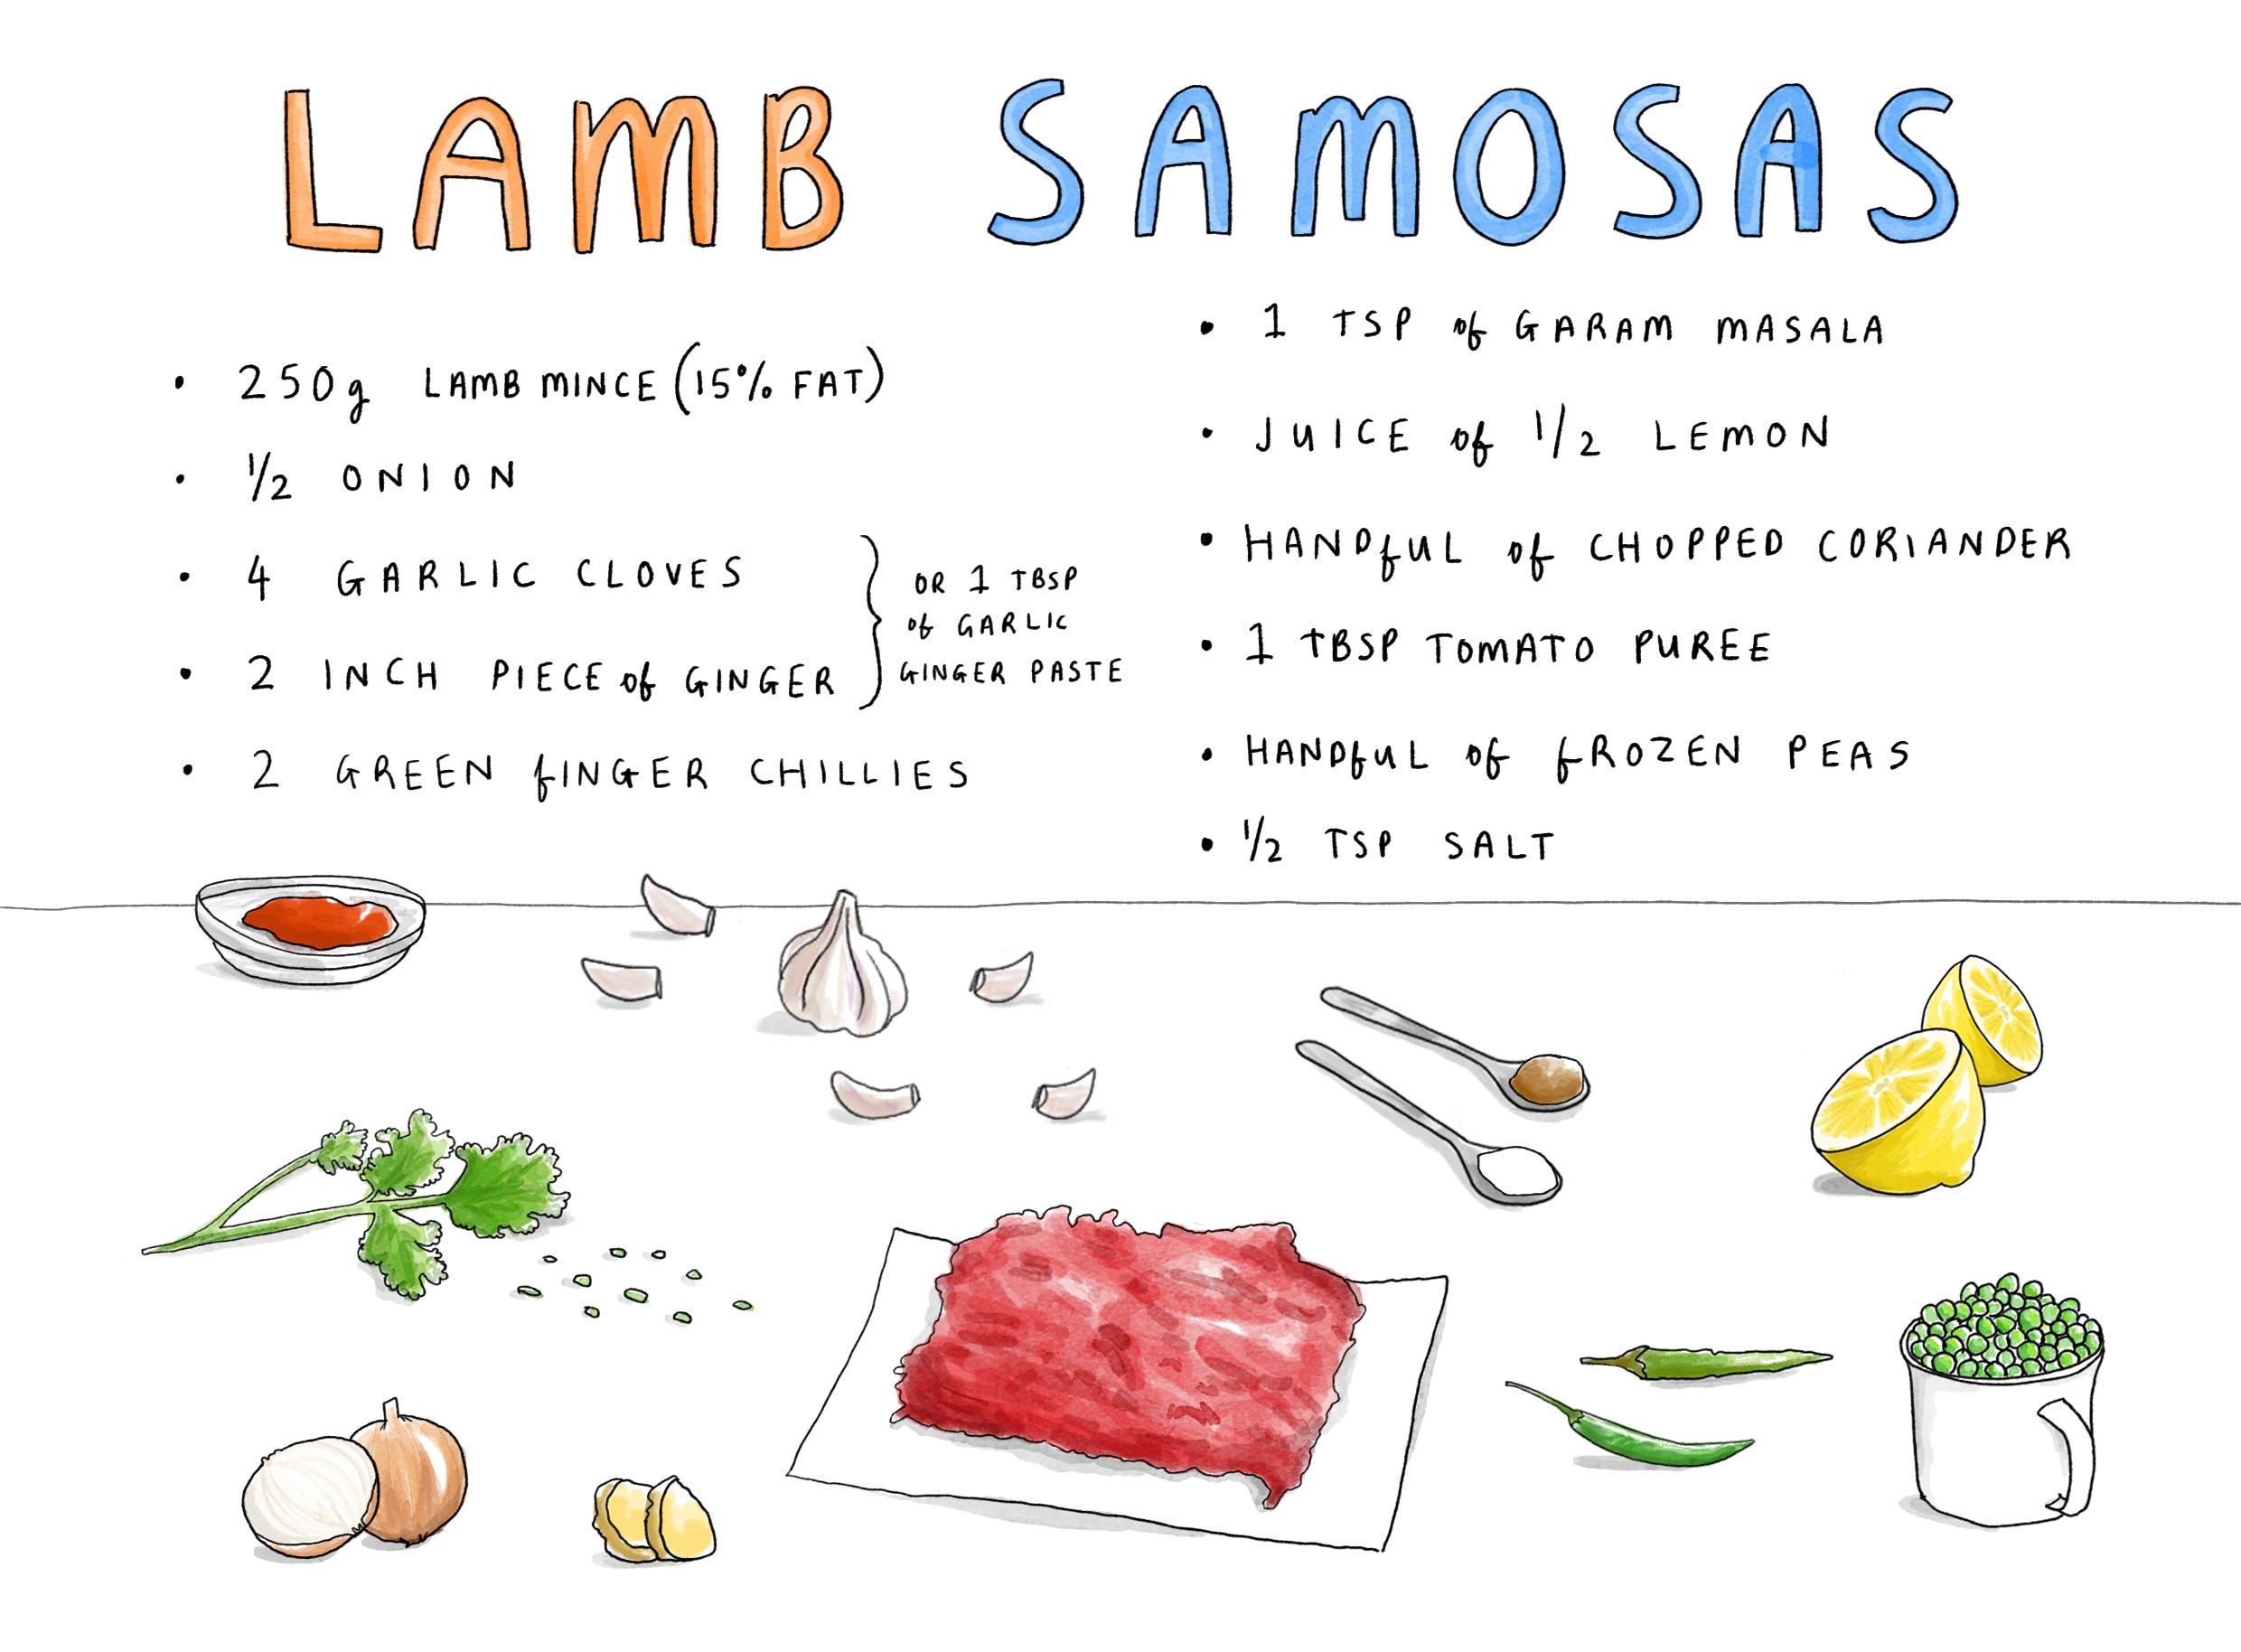
My recipe for a lightly spiced lamb samosa filling:
Method:
Start by prepping your ingredients - finely dice the onion, grate the garlic and ginger, finely slice the green chillies and chop the coriander.
In a frying pan, heat up a couple of tablespoons of vegetable oil and cook the diced onion with a pinch of salt on a low to medium heat for about 10 minutes.
Add the garlic, ginger, and chilli and combine with the onion. Add the lamb mince, sprinkle over the garam masala and salt, and using a wooden spoon, break up the mince into very small pieces. Continuously breaking up the mince, continue to cook the mixture for about 5-7 minutes.
Add the tomato puree and lemon juice and stir to combine. Add the frozen peas and stir everything together, continuing to cook everything for another 3-4 minutes until the peas are no longer frozen. Add the chopped coriander, stir everything together, taste and add more salt and lemon if required.
Transfer the mixture to a bowl to cool down, and then use about 2 tablespoons of mixture in each samosa, using the folding diagram above.
To fry, fill a deep saucepan with 500ml of vegetable oil and heat up on a low heat. The oil should take about 3-4 minutes to heat up and you will know it’s ready when a small bit of pastry sizzles when it’s dropped into the oil.
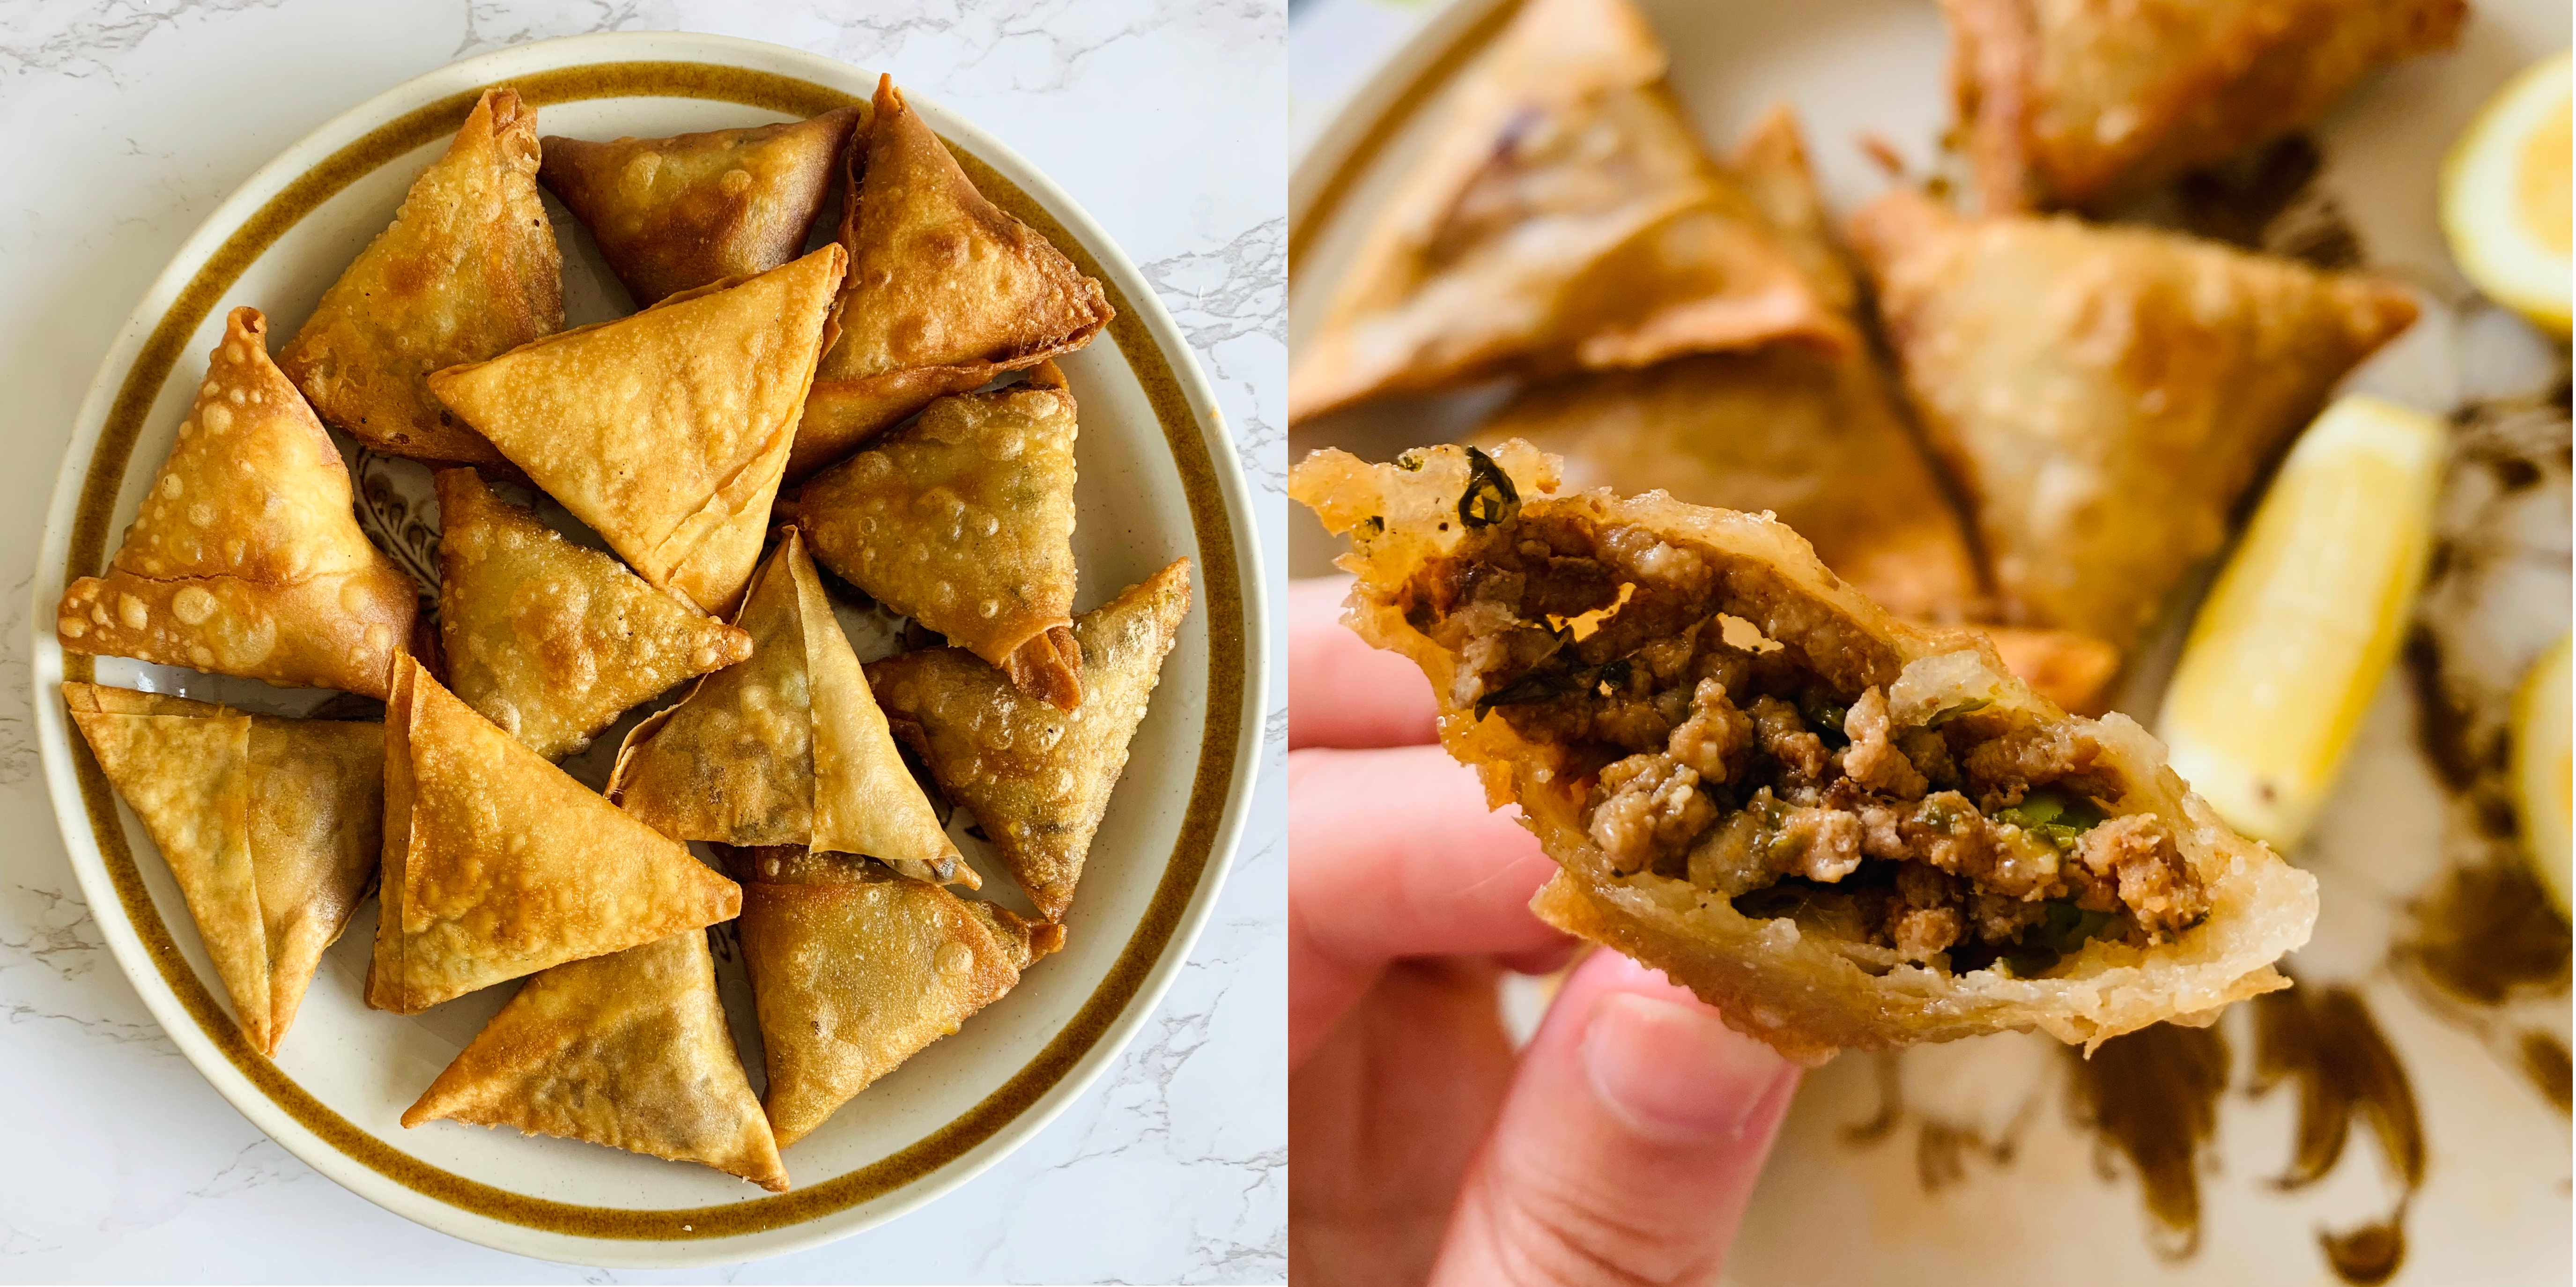
In batches of 3 or 4, depending on the size of your pan, fry the samosas on a low heat for about 4 minutes on each side until they are lightly golden. Remove with a slotted spoon and rest on some kitchen paper to soak up the excess oil.
As much as I love a green chutney, these are best served with a wedge of lemon.
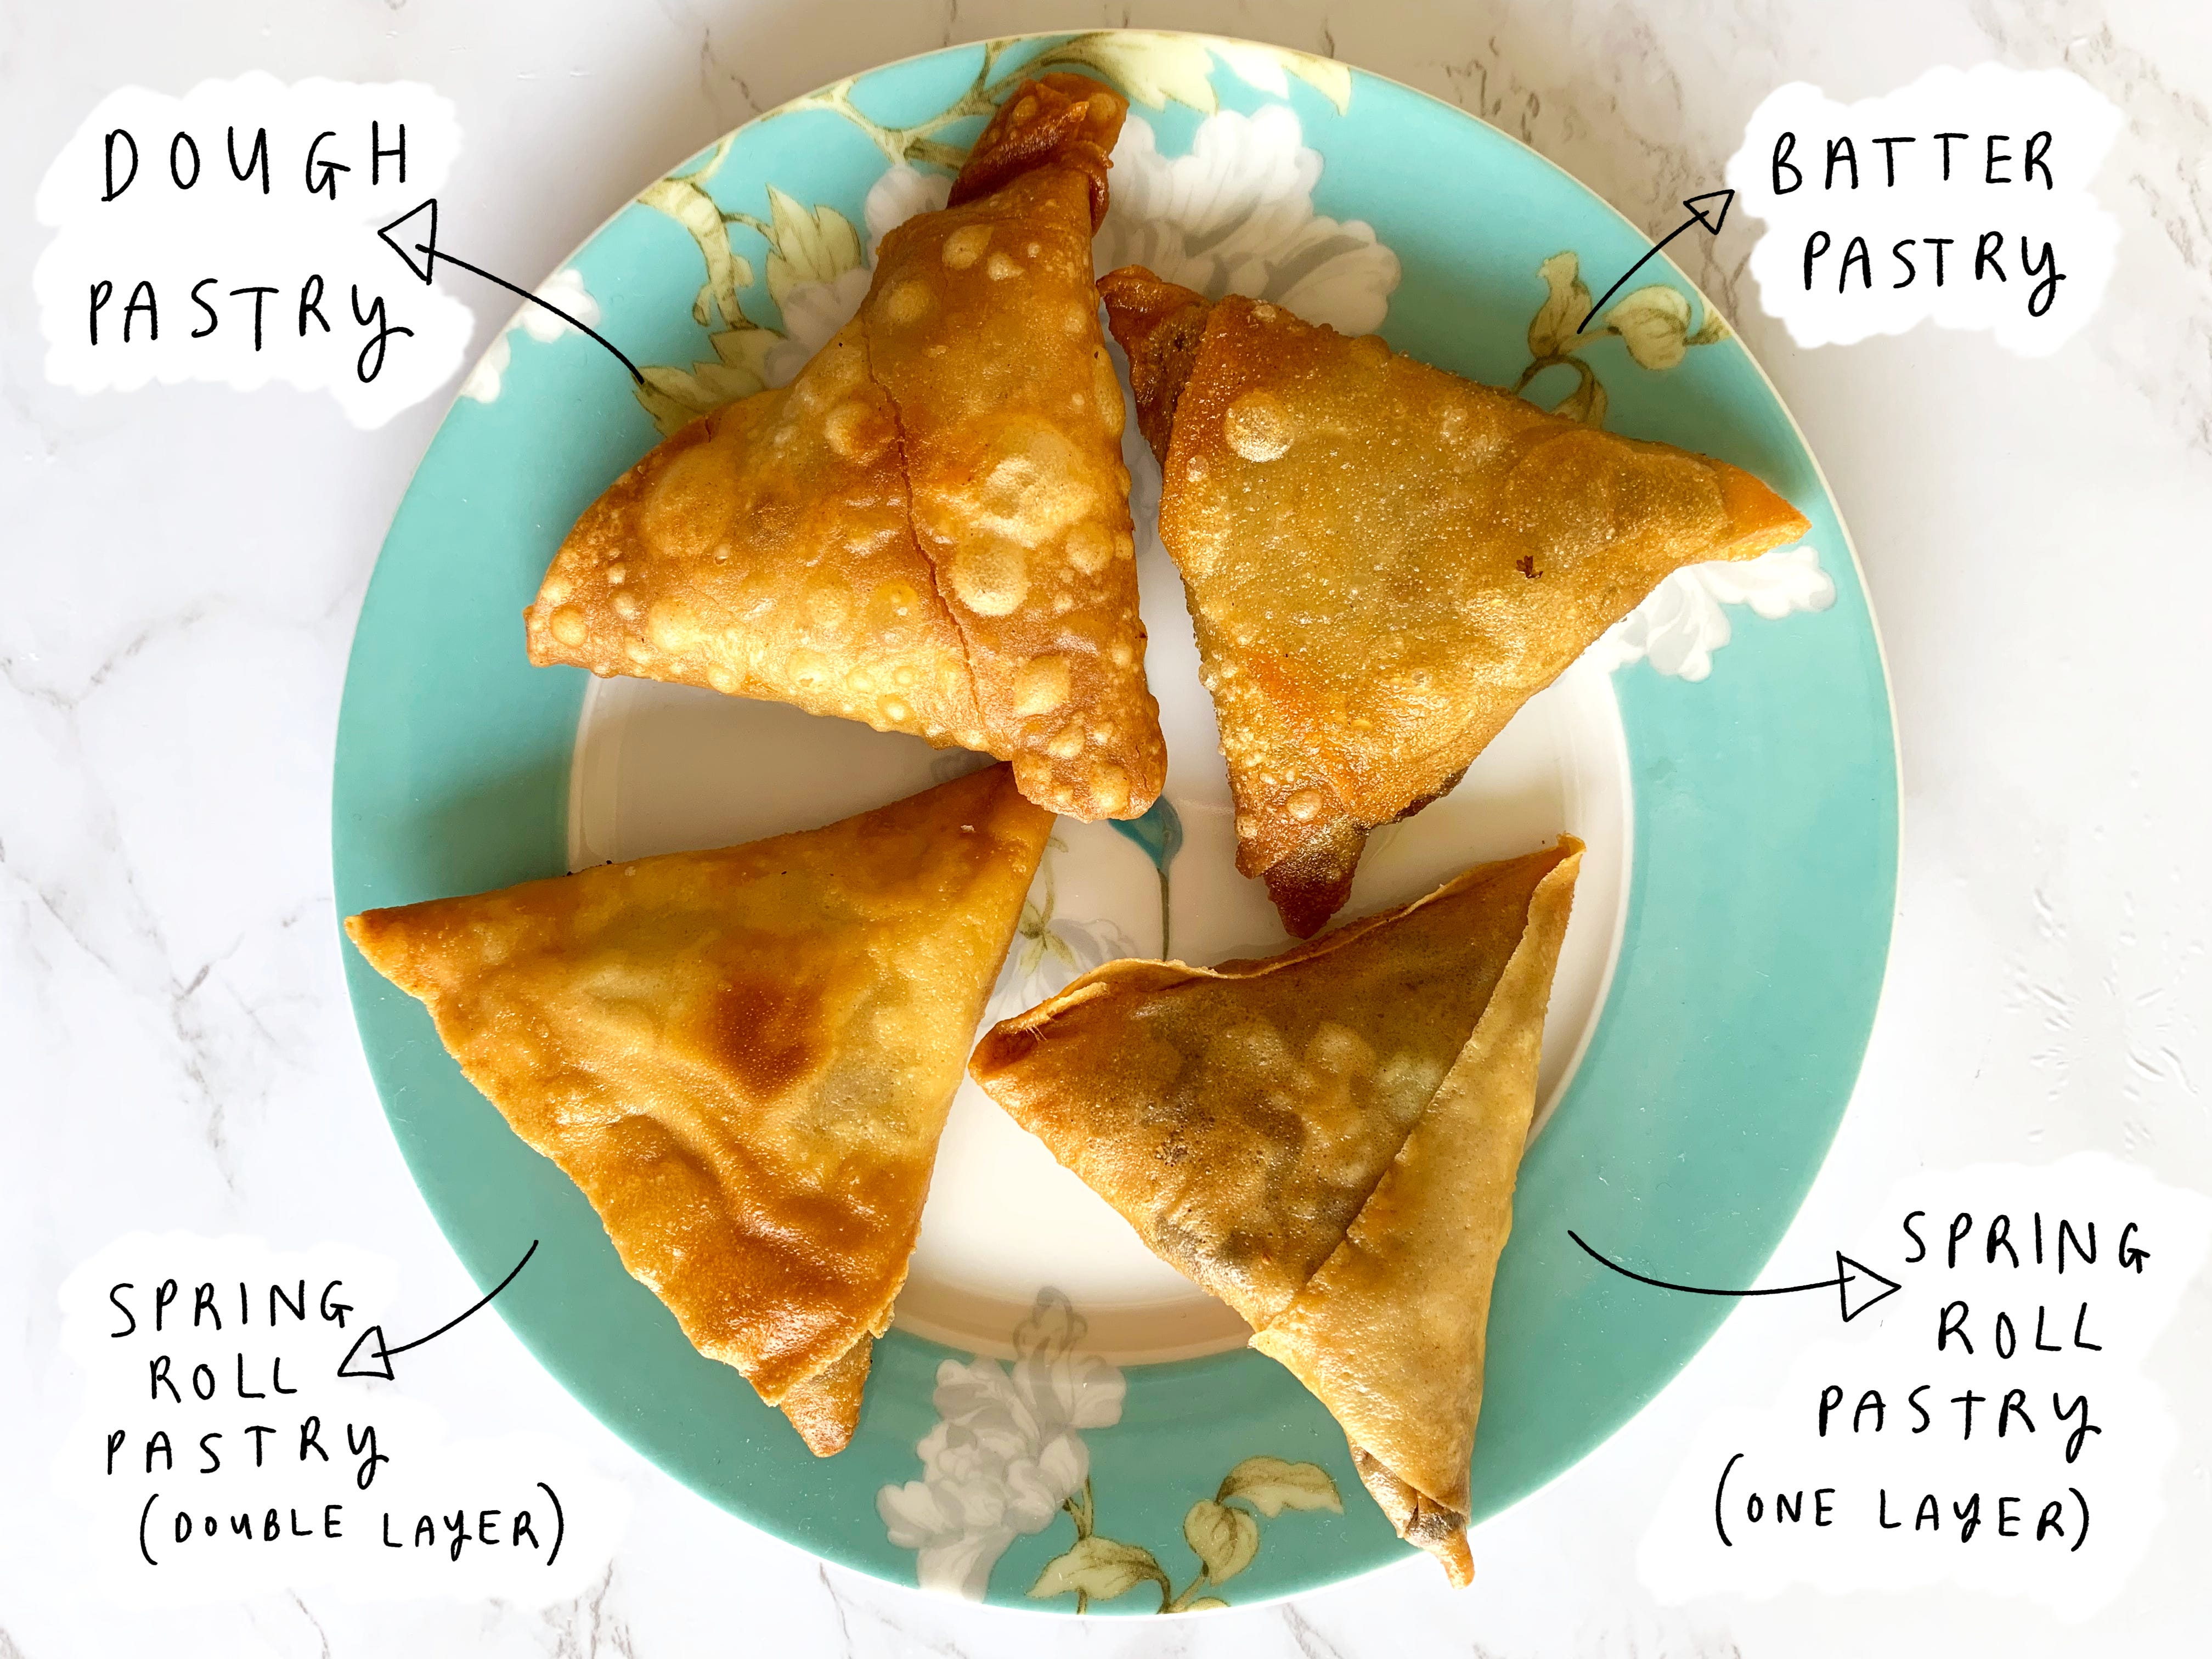
VERDICT:
You can’t go wrong with any of these pastry options.
Spring roll pastry is a foolproof beginner’s option, which I would definitely recommend if this is your first time making samosas. They are very easy to construct, a perfect texture to practice your folding, and they fry evenly leaving a satisfying crunch. A double layer of spring roll pastry takes them to another level, with double the crunch and no more effort involved. Simply separate 2 sheets of pastry first, and place them on top of each other before you start folding. Have a go making some with a single layer, and some with double and see which you prefer.
Dough pastry is the most classic way to make samosas, though from my attempts, it takes the most practice and is the most time consuming. If you use my method option 1, this will be much easier to get started, as separating the pastry apart in option 2 can take a few attempts to get right. The result is a very bubbly pastry which is satisfying to crunch down on, and is also slightly chewier than the other options. It is certainly worth mastering this pastry if you are someone who is going to make samosas regularly.
Batter pastry was new to me before writing this newsletter, but when I tasted each samosa blindly, this one came out on top for taste and texture. The pastry, once fried, was the perfect in between of the spring roll and the dough pastry with a lovely crunch, but also a slightly soft interior which blended with the lamb beautifully. If I could only make my samosas with one pastry going forward, it would be this one.
With world samosa day a month away on September 5th, I hope my practical guide to making the perfect lamb samosa will encourage you to give this a go and impress your friends and family. Thank you all for reading my practical guide to samosa making, I hope you got something out of it and please do let me know the results and share them with with me in Yesterday’s Curry facebook group: https://www.facebook.com/groups/yesterdayscurry
Until next time!